In this article, I will guide you step-by-step through installing the new Outlook app in your environment without adding its shortcut to the Windows Start Menu. This approach helps you to deploy the new Outlook selectively to a small group of pilot users for testing and adoption purposes, without impacting your entire organization.
By hiding the new Outlook shortcut from the Start Menu, you ensure that only designated pilot users can access the new app. Other users will continue using the classic Outlook seamlessly, unaffected by these changes. Once set up, selected pilot users can easily begin testing by using the “Try the New Outlook” toggle within their current classic Outlook interface as soon as it becomes available.
At the end of this guide, I will also explain how to ensure that the “Try the New Outlook” toggle is visible to the selected users, completing your setup for pilot deployment.
Prerequisites
- A valid code signing certificate:
It is recommended to use an official code signing certificate provided by a reputable Certificate Authority. Important: in this article, I will describe using a self-signed certificate, but be aware that it is not considered the most secure method. Remove such certificates from your certificate store once the installation is complete to avoid potential security risks! - MSIX packaging software:
We will be using the MSIX Packaging Tool for modifying the package. - New Outlook MSIX installation package:
Identify the Certificate Subject of the New Outlook MSIX Package
When modifying an MSIX package, you must digitally sign it afterwards. The certificate’s subject must match with the publisher listed in your package manifest file.
Follow these steps to determine the publisher subject identity:
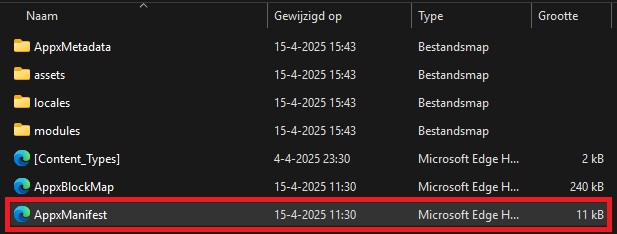
- Unzip your downloaded MSIX installation package using a tool like 7-Zip.
- Locate and open the “AppxManifest.xml” file from the extracted files.

Find Publisher in the Manifest File
Open the AppxManifest file, and search for the term “Publisher”. You will see something similar like:
<Identity Name="Microsoft.OutlookForWindows"
  ProcessorArchitecture="x64"
  Publisher="CN=Microsoft Corporation, O=Microsoft Corporation, L=Redmond, S=Washington, C=US"
  Version="1.2025.404.0" />
Copy the entire Publisher string (e.g., “CN=Microsoft Corporation, O=Microsoft Corporation, L=Redmond, S=Washington, C=US”) and save it for later. You will use it in the next step.
Creating a Self-Signed Certificate (Optional)
If you don not have an official code-signing certificate, follow these steps to create a self-signed certificate.
**Important**
Again, official certificates from a trusted certificate authority are always recommended for greater security.
To create a self-signed certificate and export it for use:
- Open Powershell as administrator.
- Use the following PowerShell script and change when needed. Always use a strong, randomly generated password for better security:
# Enter A strong password for the certificate
$password = Read-Host -AsSecureString -Prompt 'Enter a strong certificate password'

# Paramaters for the certificate
$params = @{
    Type = 'Custom'
    Subject = 'CN=Microsoft Corporation, O=Microsoft Corporation, L=Redmond, S=Washington, C=US'
    FriendlyName = 'New Outlook Package Certificate'
    TextExtension = @(
        "2.5.29.37={text}1.3.6.1.5.5.7.3.3",
        "2.5.29.19={text}")
    KeyUsage = 'DigitalSignature'
    KeyAlgorithm = 'RSA'
    KeyLength = 2048
    NotAfter = (Get-Date).AddMonths(6)           # Optional, but now set on 6 months
}

# Create the certificate
$certificate = New-SelfSignedCertificate @params

# Export the certificate to the current folder
$certificate | Export-PFXCertificate -FilePath '.\New Outlook Package Certificate.pfx' -Password $password
Customizing the New Outlook MSIX Package
Follow these instructions to modify your MSIX package and sign it with the certificate created previously:
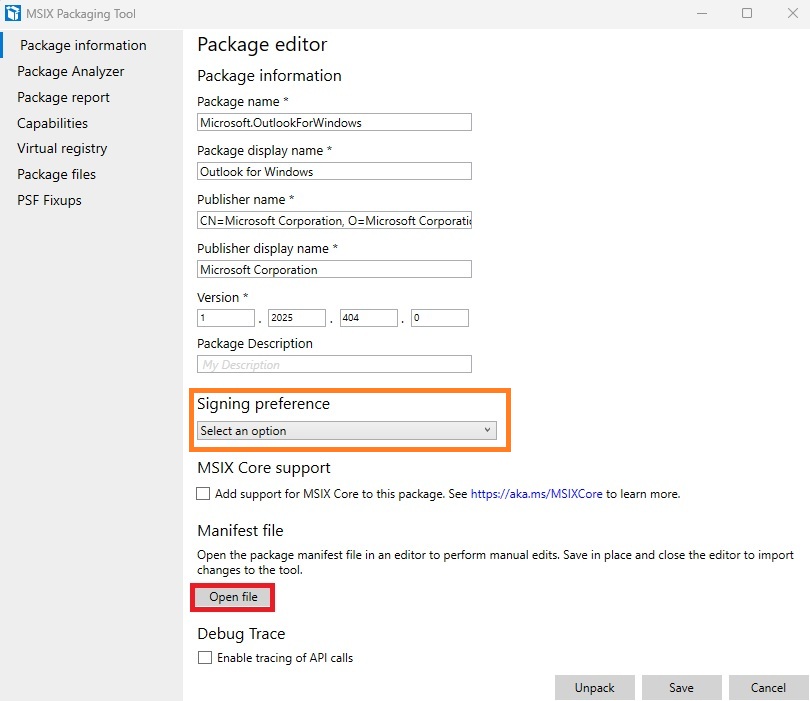
- Open the “MSIX Packaging Tool”, and choose “Package editor”.
- Open your previously downloaded New Outlook MSIX package.
- Click on “Signing preference” and select “Sign with a certificate (.pfx)”. Browse and select your certificate and enter the certificate password.
- Next, open and edit the manifest by clicking “Open file”.

Editing Manifest to Hide Outlook Shortcut
In the manifest file:
- Find the entry “AppListEntry” and change it from “default” to “none“. This change prevents Outlook from appearing in the Windows Start menu:
<uap:VisualElements AppListEntry="none" BackgroundColor="transparent" Description="Microsoft Outlook" DisplayName="Outlook" Square150x150Logo="Assets\MedTile.png" Square44x44Logo="Assets\AppList.png">
    <uap:InitialRotationPreference>
        <uap:Rotation Preference="portrait"/>
        <uap:Rotation Preference="landscape"/>
    </uap:InitialRotationPreference>
    <uap:DefaultTile Square71x71Logo="Assets\SmallTile.png" Wide310x150Logo="Assets\WideTile.png" Square310x310Logo="Assets\LargeTile.png"/>
</uap:VisualElements>
- Next, search the manifest file for the capability named “internetClient”. The Packaging Tool requires you to remove duplicate capability lines if any exist. Remove any additional line like “<rescap:Capability Name=”internetClient” />”, leaving only a single “internetClient” capability and associated capabilities entries like the one below:
<Capabilities>
    <Capability Name="internetClient" />
    <rescap:Capability Name="runFullTrust" />
    <rescap:Capability Name="unvirtualizedResources" />
</Capabilities>
- Save the modified manifest file, close the editor, and return to the MSIX Packaging Tool.
- Save the modified MSIX package by clicking “Save”.
Installing the Customized MSIX Outlook Package
Before you install the customized MSIX package, import your self-signed certificate to the computer’s Trusted Root Certification Authorities store. You can use PowerShell to import the certificate quickly:
# Enter the password used to create the certificate
$password = Read-Host -AsSecureString -Prompt 'Enter certificate password'

# Define importe paramaters
$params = @{
    FilePath = '.\New Outlook Package Certificate.cer'
    CertStoreLocation = 'Cert:\LocalMachine\Root'
    Password = $password
}

# Import the certificate
Import-PfxCertificate @params
Your MSIX package should now install successfully without showing the New Outlook shortcut in the Start Menu.
How to Enable the “Try the New Outlook” Toggle
Since the Outlook shortcut is hidden, users must switch between the classic and new Outlook through the built-in “Try the New Outlook” toggle. You need to ensure the toggle is enabled and visible within Outlook itself.
To learn how to enable or disable this toggle, refer to Microsoft’s official documentation available here.
With this setup, your pilot users can seamlessly toggle between the new Outlook and the classic version, giving them the opportunity to test and experience the new design and features.
This complete guide ensures a controlled rollout and pilot-testing of the New Outlook, optimized to help you deploy Outlook in a careful, strategic manner without disrupting your current email environment for the rest of the users.